Mobile JobSheet Help Site

How To Create And Use Invoices

You can create one or multiple Invoices associated with each job. Each Invoice can include either parts already added from a) the quote, b) the engineer, or c) create new items from the parts database. Labour works in a similar way; existing labour items can also be added from the a) quote, b) the engineer, or c) new labour added.
To create an invoice please follow the short step-by-step guide below:
 
To Create An Invoice:
Here is a short list of steps to follow for creating a invoice. If you wish to see any of the points in detail, please click on the title to expand for further detail.


Once logged into the Managment Web Portal find the job that you wish to edit on the Active Job Page. Click on the Edit Job button to the left. Once on the Edit Job page, Scroll down the page until you see a group of buttons on the right side, Click on the one that says Invoicing and this will take you to the Create Invoice page.


Adding the times pricing by clicking the Add Base Times button. This will prompt a pop up window where you can add the generic rates by choosing the pre set times, (click HERE for a set-up guide) choose the correct options in the drop down fields then click the Select button. To edit the times prices come back to this page and there will be a field with already existing times. On each row there will be a Delete or Edit button.


Adding the parts pricing by clicking the Add Parts button. This will prompt a pop up window where you can click a button that says 
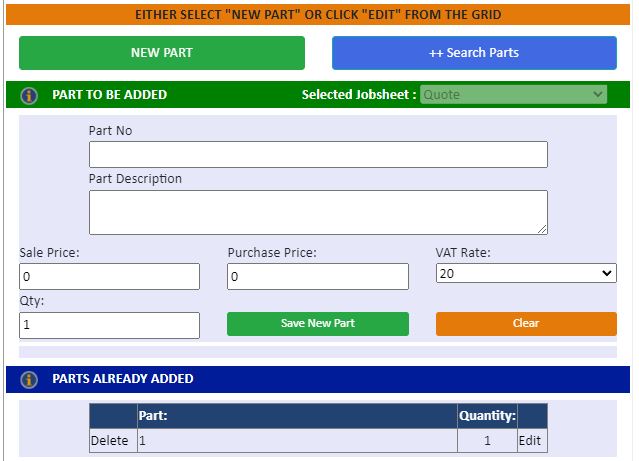
New Part. At the top you can search through parts using the ++ Search Parts button. In the reference fields you can add new parts by filling out the information and clicking on the Save New Part button. Within the bottom reference field you can edit pre existing parts by clicking on the Delete or Edit links.


In section 2 there will be a text box option. Here you will be able to add optional text about the invoice before Creating the invoice.


In section 3 there will be a slider option. This will automatically be set to ON. Use the slider to set the status to CLOSED.


Once you have done this there will be a button that says Create Invoice. Click the button to create the invoice.


Once you have created an invoice, on the Create Invoice page there will be a reference field at the bottom for existing invoices.

 
View Or Delete Invoices:
1) Go to bottom of the Create Invoices page (Part 1 of the guide) and you will see that the invoices created are in rows.

2) Adjacent to each row are buttons to View and Delete an invoice.
 
Search And View All Invoices:
1) From the top menu's go to -> Reports -> Search All Invoices.

2) On the Searching Invoices page there will be a search area at the top of the page. This will allow you to find the invoices by who made the invoice or by date.

3) You can also see the Job Number of a invoice which will take you to the job if you click the button or you can see the invoice in detail by clicking the Invoice Number button.
 
  With the above information you should be able to create an invoice. Should you encounter any issues please give us a call.
 
© Infotek Software 2019